
How to make wood block pumpkins with Dollar Tree Jenga blocks. These Dollar Tree craft pumpkins are easy to make and can be made to match your fall or Halloween decor. It's an inexpensive fall wood pumpkin craft that looks adorable on a shelf or in a three tier tray.

Dollar Tree is one of my favorite stores for craft supplies. While they have a large selection of actual craft supplies, I usually get my inspiration from the other aisles in the store.
Dollar Tree sells mini Jenga blocks called Tumbling Towers. For only $1, you get 36 wood blocks. While it's a fun game and all, I think it's even more fun to make Jenga block crafts.
They can be hard to find, but I was able to score a few sets. I used them for wood pumpkin craft ideas. Dollar Tree Jenga block pumpkins are so cute, and they are easy to make.
Dollar Tree Jenga Block Pumpkins
I'm more of a fall decorating person than just decorating for Halloween. I'd love to decorate just for Halloween, but I don't have a lot of time. Fall decorations can stay up until Thanksgiving.
For more fall decorating ideas and Dollar Tree fall crafts, check out these posts:
- DIY Dollar Tree Fall Pizza Pan Sign
- How to Make a Leaf Candle Holder
- Owl Fall Wreath
- Pool Noodle Pumpkin
- No Sew Fabric Pumpkins
- Pinecone Fire Starters
- Canning Ring Wreath
- Sugar Skull Wreath
- Sweater Wreath DIY

Where to Buy Wood for Wood Block Pumpkins
I made Dollar Tree Jenga block pumpkins. These wood block pumpkins are smaller, but that's what worked in my space.
If you're making Dollar Tree Jenga block craft ideas, keep in mind that this is a mini game. If you don't have a Dollar Tree near you, you can find a mini Jenga block style game on Amazon.
For larger wood block pumpkins, you can buy larger blocks to use. You can also find bulk blocks for crafting on Etsy.
How Do You Make Pumpkins out of Jenga Blocks?
It's easy to make wood block pumpkins. You'll just make a stack with three blocks, then a row of two blocks, and finally one block in the middle.
Make two of these stacks and then glue them together. Tada! You now have Dollar Tree craft pumpkins.

Dollar Tree Wood Pumpkin Crafts Variations
These Jenga block crafts pumpkins are easy to make, and you can really get creative. I painted mine and added a cork for a stem and add some lace ribbon.
Try one of these variations for wood pumpkin craft ideas:
- Use a stick to make the stem.
- Add dried Spanish moss to the top to cover the glue.
- Tie burlap ribbon to the top.
- Tie twine around the stem. I really like this twine with leaves.
- Add a felt leaf or fabric leaf to the top.
- Stain the Jenga block crafts.
- Use distress ink to make them look aged.
- Cut a Jenga block in half for the stem.

Dollar Tree Jenga Block Pumpkin Supplies
You will need the following to make Dollar Tree craft pumpkins:
- Wood glue. I used the wood glue from Dollar Tree. Gorilla wood glue is really good too.
- Tumbling Tower Game. I used the mini game from Dollar Tree, you can also buy bulk wood blocks or use a full sized Jenga game for bigger wooden pumpkin crafts.
- Hot glue.
- Champagne corks. You can also cut a block in half or use a stick.
- Paint brush.
- Lace ribbon. I got mine from Dollar Tree. You can also use burlap ribbon or twine.
- Scissors.
- Paint. I used Waverly white, ocean, and merlot chalk paint, but you can use acrylic paint.

Jenga Block Pumpkin Directions
Step #1
Start by gluing your wood blocks together. Make size sets of three and six sets of two blocks. Let dry for 30 minutes.

Step #2
Cut the cork in half with scissors or an X-acto knife while the glue dries.
Step #3
Use the wood glue to glue together two of the sets of three blocks. Then on either side glue a section of two blocks. Finally, add a single block on top of the set of two blocks.

I stood mine up and make sure that they were level on the top.
Repeat for the other two pumpkins. Let dry for 30 minutes.
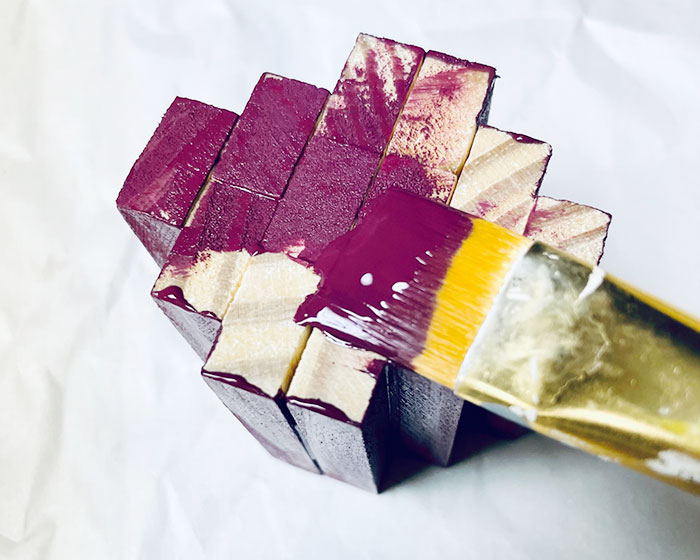
Step #4
Paint each pumpkin with two coats of paint, letting them dry between coats.
Step #5
Use hot glue to attach the corks to the top for the stem. Then tie a piece of ribbon or lace around the cork.
See how easy it is to make Dollar Tree Jenga block pumpkins? I set mine on a 3-tier tray. You can also set them on a shelf or use as a centerpiece. I'll have more Dollar Tree Jenga block craft ideas, so join the newsletter for updates.
Like this post? Pin it!


Dollar Tree Jenga Block Pumpkins
materials:
- Wood glue.
- Tumbling Tower Game
- Hot glue
- Champagne corks
- Lace ribbon
- Paint
tools:
- Scissors
- Paint brush
steps:
- Start by gluing your wood blocks together. Make size sets of three and six sets of two blocks. Let dry for 30 minutes.
- Cut the cork in half with scissors or an X-acto knife while the glue dries.
- Use the wood glue to glue together two of the sets of three blocks. Then on either side glue a section of two blocks. Finally, add a single block on top of the set of two blocks. I stood mine up and make sure that they were level on the top. Repeat for the other two pumpkins. Let dry for 30 minutes.
- Paint each pumpkin with two coats of paint, letting them dry between coats.
- Use hot glue to attach the corks to the top for the stem. Then tie a piece of ribbon or lace around the cork.

No comments:
Post a Comment