
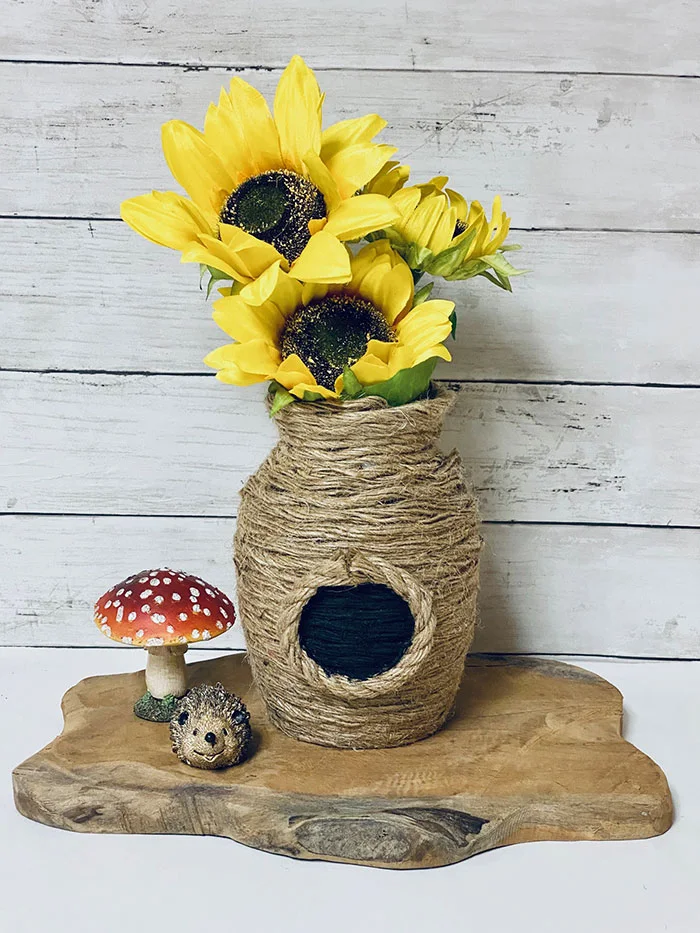
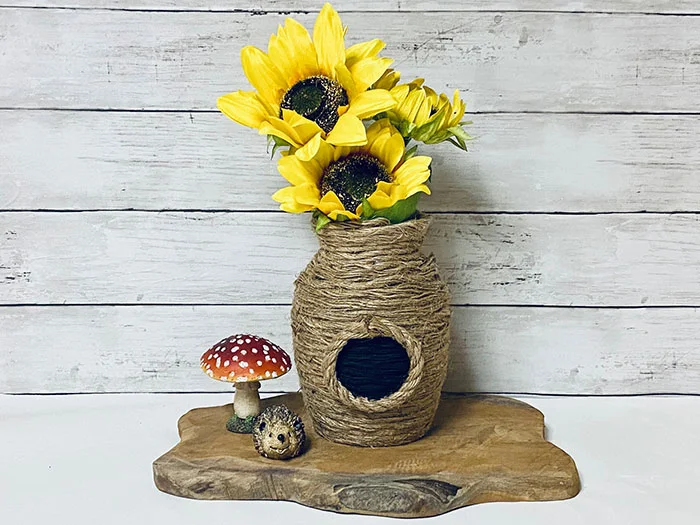
How to make a DIY beehive craft. I'm using this as beehive centerpieces for my table with some bright and cheery sunflowers in the vase. This would also be really cute for a wedding or other event to use as an inexpensive centerpiece.

DIY Dollar Tree Beehive Vase
My Facebook memories tell me that this time each year I'm in a major purge and update the house mood. I've hauled so much stuff to the Mennonite thrift store, the kids are getting a little scared.
Out with the old, in with the new. Things need to change. The Christmas decorations are put away, and Valentine's Day decorations will be soon, too.
It's time for spring and evergreen decorations. This year, I'm using some farmhouse bee decor to decorate the dining room.
For more farmhouse and Dollar Tree DIYs, check out these posts:
- Dollar Tree Calendar Magnets
- Dollar Tree Heart Wreath
- Dollar Tree Cotton Ball Wreath
- Wooden Clothespin Basket
- Farmhouse Style Coasters With Mini Pallets
- Flower Pot Spring Wreath
- Rustic Farmhouse Coasters With Mason Jar Rings
- Canning Ring Wreath
- Dollar Tree Pizza Pan Sign
- Dollar Tree Fake Terrarium
- Dollar Tree Flower Pot Gnome
- Dollar Tree Picture Frame Lantern Tutorial
- Farmhouse Pizza Pan Wreath
How Do You Make a Beehive For Decorations?
There are several ways to make a bee hive craft. I made a beehive vase DIY, but you can use other things instead of a vase.
Here are some good ideas to try:
- Flower pots (You can also get smaller quantities at Dollar Tree, but they go quick.)
- Small bucket
- Vase
If you just want a DIY Dollar Tree beehive and don't want to add flowers, you can use a flower pot turned upside down and follow the same method I used to make my beehive vase DIY.
Best Flowers for a DIY Beehive Craft
I used sunflowers for my beehive centerpieces because I like sunflowers. Bees also like sunflowers, so it works.
Since the main colors are brown and yellow (if you add some bees), several colors will work for flowers.
Try one of these flowers for your DIY Dollar Tree beehive:
- Sunflowers
- Daisies
- Lavender
- Vines and greenery
- Any blue flower
- Any white flower

Bee Vase DIY Dollar Tree Variations
I made a simple bee hive craft. Here are some more bee vase diy ideas:
- Use colored nautical rope to match your decor.
- Decorate with small bees, butterflies, or flowers on the hive.
- Tie yellow ribbon or black and white ribbon around the DIY bee decor.
- Use black felt to make the circle instead of painting it.
DIY Dollar Tree Beehive Supplies
You will need the following to make Dollar Tree bee decorations:
- Vase - I picked up a clear vase at Dollar Tree. You can shop thrift stores or repurpose one from your home.
- Nautical Rope - I buy mine at Dollar Tree, but you can also get it on Etsy. I used the darker brown rope, but they also have a cream rope.
- Black paint. I prefer chalk paint, but acrylic paint will also work. Alternately, you could cut a circle from felt.
- Scissors
- Paint brush
- Hot glue gun and hot glue - I love the Gorilla hot glue gun.

How Do You Make a Beehive With Rope?
Step #1
Start by separating the nautical rope into individual strands. The rope is too thick to use as it comes, but if you use a larger vase or flower pot, then you may not want to separate it.

Step #2
Add a line of hot glue to the bottom of the vase and place the nautical rope on top. Repeat with more glue as you wrap the rope around the vase.

Step #3
Now it's time to make the circle. For my vase, I cut a 5 inch section of nautical rope to make the outer part of the circle. If you used a different vase, you'll have to use the rope to measure your circle and then cut.
Use hot glue to attach the rope to make a circle.

Step #4
Add black paint inside the circle to make it look like a hole. You can also use black felt and glue it on before adding the circle.
Then add your sunflowers or other flowers. I used mine on my dining room table on a black and white buffalo check table runner for farmhouse bee decor.

I love this cute bee beehive vase DIY! It looks adorable on the table as a centerpiece.
Like this post? Pin it!

DIY Dollar Tree Beehive Vase
materials:
- Vase
- Nautical Rope
- Black paint
tools:
- Scissors
- Paint brush
- Hot glue gun and hot glue
steps:
- Start by separating the nautical rope into individual strands. The rope is too thick to use as it comes, but if you use a larger vase or flower pot, then you may not want to separate it.
- Add a line of hot glue to the bottom of the vase and place the nautical rope on top. Repeat with more glue as you wrap the rope around the vase.
- Now it's time to make the circle. For my vase, I cut a 5 inch section of nautical rope to make the outer part of the circle. If you used a different vase, you'll have to use the rope to measure your circle and then cut. Use hot glue to attach the rope to make a circle.
- Add black paint inside the circle to make it look like a hole. You can also use black felt and glue it on before adding the circle.
- Then add your sunflowers or other flowers.

Super cute! I love it and will make my own...Nice thinking outside the vase...(lol).
ReplyDelete